Main boom 2.60m, Superlift 1.20m, Flyjib 2.60m. Total 5.20 meters.
On this site you will find a description of the crane in its third configuration, with a main boom
of 2.60 meters, superlift 1.20 meters and a flyjib of 2.60 meters, total height 5.20 meters.
Preparation
After I had made a version of the crane in SDB-configuration of 3.30 meters
with superlift and ballast, I have made a flyjib and two A-frames and the maximum height is now extended
to 5.20 meters, which compared to full scale is about 156 meters.
When the weather one day was good I took the crane outside to make some nice pictures of the flyjib.
Since the crane is that high, a small wind would cause the crane to collapse, I had to put it up
in the backyard of my parents house. Regrettably the backyard disturbs the pictures, but I hope
the model can be seen anyway.
My onkel helped me with the setup, since the wind were a bit stronger than I first expected, so we had to
support the crane sometimes when the wind suddenly came up.
Like a real crane, all of the parts has to be brought to the place where the lift is going to take place. In my
case I had to carry all the parts outside, make sure the light was good and plenty of room to make some good pictures.
The time went fast, and it almost took 3 hour before the crane was raised to full height.
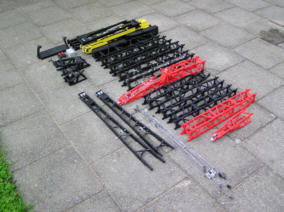 The parts for this setup are:
Chassis with superstructure and A-bracket.
4 outriggers.
4 pad jacks.
8 pad jack boards.
4 counterweights of 1450g each.
1 counterweight of 2500g.
6 counterweight of brass, total 8.6 kg.
1 support for maxi-lift ballast.
1 bottompart of Superlift.
1 bottompart of main boom.
1 bottompart of flyjib.
1 extension for superlift, black.
3 extensions for main boom, black.
3 extensions for flyjib, 2 black and one red.
1 toppiece of Superlift.
1 toppiece of main boom.
1 toppiece of flyjib.
2 A-brackets to the flyjib.
26 quy pins.
1 lifting hook.
Assembly
Like the assembly of a single main boom, you first have to mount the 4 outriggers, pad jacks and pad jack boards
are set in place to give the crane the necessary stability. When the crane is going to lift something high up
in the air, it is very important that the chassis is absolutely horizontal.
In this case I had to place the crane one a plate which I made horisontal before the crane was setup.
When the crane is raised with superlift and flyjib, the first part is absolutely the same as the setup of superlift alone.
See Superlift opsćtning.
First the A-bracket is raised to a little above vertical position, and an assistant crane helps with the assembling of the single
parts of the superlift.
First the bottompart of the superlift is mount on the crane, thereafter an extension of 60 cm, which is compared to 18 meters. Thereafter
the toppiece of the superlift. In between the end of the A-bracket and the top of the superlift the quy-pins is mount.
Some quy-pins for the maxi-lift ballast are also attached to the top of the Superlift before it is raised up in the air.
The top of the superlift is red, to make it more visible for airplanes.
Then the superlift is raised by pulling the A-bracket down again.
When the Superlift is assemblied and raised a little, the assembly of the main boom can take place.
First part of the main boom is the bottompart, thereafter 3 black extensions of 60 cm, which corrosponds to 18 meters each.
At last the toppiece with the large bearings for the flyjib and A-brackets.
When the whole boom is fitted, the quy-pins is attached between the top of the main boom, and half the way to the top
of the Superlift, the last half part is made with two blocks and a lot of wires.
When the main boom and superlift is in place, it is time to raise the Superlift to its working position, when the
superlift is pulled backwards the wires for the main boom is lowered, thereby the superlift can be luffed to a backwards
position without dropping down.
When the superlift is in this backward position the support for the maxi-lift ballast and the superstructure-ballast can be attached.
On this model I use two counterweights of 1450 g and on piece of metal of 2500 g, and a number of brass-pieces of 8.6 kilos, total 14 kg. On the superstructure is put two
counterweights of 1450 g. That means total 16.9 kg.
Below I have put a series of pictures which descripes the assembly.
Assembly of the flyjib
Now the flyjib is ready to bee assemblied.
First the bottompart is mount at the end of the main boom, then 2 black extensions of 60 cm each, which is compared to 18 meters.
Then a single red extension of 60 cm. At last the toppiece of the flyjib is attached to the rest, and the tip of
the flyjib is placed in a little waggon, which make the flyjib able to move on the field when the crane is raised.
Then the two A-brackets are mount in the junction between the main boom and flyjib.
When the whole boom is assemblied the quy-pins is mount between the bottom of the main boom and the lower A-bracket, and between
the upper A-bracket and the tip of the flyjib.
Halfway on the flyjib a small quy-pin is placed between the long quy-pin and the flyjib. To lower the forces from the
weight of the flyjib.
Then the wires are put between the two A-brackets. On my crane I have 12 blocks, which make one 9V motor cabable of
lifting the flyjib.
At last the wire for the hoist and the lifting hook is put on the crane. The whole crane is now ready to be raised to
working position.
Below I have put a series of pictures which descripes the assembly.
The crane is raised
Now the crane is ready to be raised. This is done in two steps, first the main boom is raised and then the flyjib.
First the wire between the mainboom and superlift is pulled and the wire for the flyjib is loose, that makes the
boom luff in the middle. The whole boom is too heavy to lift in straight, therefore the boom is luffed in the middle.
The small waggon below the tip of the flyjib makes sure the boom can roll on the surface.
When the main boom reaches the desired position, often almost vertical, you begin to lift the flyjib.
The flyjib is raised with the wires and blocks between the two A-brackets.
Below I have put a series of pictures which descripes the assembly.
Fully raised to 5.20 meters.
Here is a row of pictures, showing the crane, raised to full height. Because of sudden gust of wind,
I had to be near the crane at all time, since the wind could cause the crane to get out of balance, and collapse.

| Max capacity |
Not tested |
|
| Max height |
5.20 m |
|
| Weight (without counterweight) |
7.8 kg |
|
| Counterweight |
16.9 kg |
|
|
Back to main
) The parts for this setup are:
The parts for this setup are:)
)
)
)
)
)
)
)
)
)
)
)
)
)
)
)
)
)
)
)
)
)
)
)
)
)
)
)